How to build a load test on your Kafka cluster using Gatling

6 min read
Jun 22, 2023 8:35:00 AM
  • Who is this for: Developers, QA, Software Developer Engineers in Test
  • What you will learn: How to build a load test on your Kafka cluster using Gatling
  • What you will build: You will develop a Java load test dedicated to your Kafka cluster
  • Prerequisites: In this course, you need knowledge of Gatling, Gradle/ Maven, and Java.
  • Time needed: 35 minutes

Some of our users have inquired whether we can load test their Kafka cluster using Gatling. You’ve asked, and we’ve delivered: here’s a step-by-step guide!


What is Kafka?

Apache Kafka is an open-source, real-time data streaming platform. It can collect, store, and distribute data streams (events) across large-scale applications and systems.
Kafka was originally developed by LinkedIn and subsequently donated to the Apache Foundation. 

More specifically, Kafka is a distributed messaging system that sends data as messages between producers and consumers (message creators and message readers). Messages are stored in partitions and distributed across multiple nodes in a Kafka server cluster.

Some of the well-known companies using Apache Kafka include: Uber, Square, Shopify, and Spotify. 


What is Gatling?

Gatling is a leading load-testing solution with a test-as-code approach in Java, Scala, and Kotlin. It can test applications using a variety of protocols and injection profiles. Gatling Enterprise additionally offers integrations with popular CI/CD tools such as Jenkins, Azure DevOps Pipelines, and GitHub Actions. Gatling’s test results include metrics such as response time and the associated statistical analyses. 


Why load test your Kafka server? 

Overloading a Kafka broker can lead to latency, message loss, and even crashes. Load testing helps identify these bottlenecks and determine the maximum load a broker can handle before performance degradation. Find and fix performance problems early to make sure your broker can scale with your business. 

Jigarkhwar, a Gatling community member, has developed a plugin to perform load tests against Kafka brokers. We are constantly evaluating how to deliver value to load testers, so if you have ideas for expanded functionality, we would love to hear from you by leaving a comment on our Public Roadmap


How to test your Kafka server with Gatling

The project is configured to work with sbt. It can also be ported to other build tools like Maven or Gradle. The rest of this guide shows Java code examples compatible with the Maven and Gradle plugins. 

Prerequisites

To use this guide, you will need to meet the following prerequisites:  

Add the dependencies

The first step is to add the dependencies to your project.

Maven

Add a new repository to your .pom file

<repositories>
 <repository>
   <id>confluent</id>
   <url>https://packages.confluent.io/maven/</url>
 </repository>
</repositories>


Add this dependency to your .pom file

<dependency>
 <groupId>org.galaxio</groupId>
 <artifactId>gatling-kafka-plugin_2.13</artifactId>
 <version>0.12.0</version>
 <scope>test</scope>
</dependency>


Gradle

Add a new repository to your build.gradle file 

repositories {
  mavenCentral()
    maven {
        url "https://packages.confluent.io/maven/"
    }
}


Add this dependency to your build.gradle file 

dependencies {
    gatling "org.galaxio:gatling-kafka-plugin_2.13:0.12.0"
}

Add the imports

Create a new KafkaSimulation class. Next, you must add the imports to your simulation class to use the Kafka plugin.

org.galaxio.gatling.kafka.javaapi.protocol.*;
import static io.gatling.javaapi.core.CoreDsl.*;
import static org.galaxio.gatling.kafka.javaapi.KafkaDsl.*;


Define your cluster configuration

Define the configuration of your Kafka cluster (at least the cluster URL and topic name(s)).

private final KafkaProtocolBuilder kafkaProtocol = kafka()
       .topic("test")
       .properties(
               Map.of(
                       ProducerConfig.ACKS_CONFIG, "1",
                       ProducerConfig.BOOTSTRAP_SERVERS_CONFIG, "localhost:9092",
                       ProducerConfig.KEY_SERIALIZER_CLASS_CONFIG, "org.apache.kafka.common.serialization.StringSerializer",
                       ProducerConfig.VALUE_SERIALIZER_CLASS_CONFIG , "org.apache.kafka.common.serialization.StringSerializer")
       );


If you use authentication with your Kafka cluster (e.g., SASL), you must define it here. In a complex configuration like the above, consider using environment variables. They allow you to easily organize, maintain, and change the Kafka cluster configuration. 

For example:

public static final String IP_SERVER = System.getProperty("IP_SERVER", "");
public static final String URL_REGISTRY = System.getProperty("URL_REGISTRY", "");
public static final String USER_AUTH = System.getProperty("USER_AUTH", "");
private final KafkaProtocolBuilder kafkaProtocol = kafka()
       .topic("test")
       .properties(
               Map.of(
                       ProducerConfig.ACKS_CONFIG, "1",
                       ProducerConfig.BOOTSTRAP_SERVERS_CONFIG, IP_SERVER,
                       ProducerConfig.MAX_REQUEST_SIZE_CONFIG, "2097152",
                       "security.protocol", "SASL_SSL",
                       "sasl.mechanism", "PLAIN",
                       "client.dns.lookup", "use_all_dns_ips",
                       "sasl.jaas.config", "org.apache.kafka.common.security.plain.PlainLoginModule required username=\"$USERNAME_BROKER\" password=\"$PASSWORD_BROKER\";",
                       "schema.registry.url",URL_REGISTRY,
                       "basic.auth.credentials.source","USER_INFO",
                       "basic.auth.user.info", USER_AUTH
       )
       );


Test scenario

Let’s take a simple example: pushing a text message with a header to our cluster. 

private final Headers headers = new RecordHeaders(new Header[]{new RecordHeader("test-header", "value".getBytes())});
private final ScenarioBuilder kafkaProducer = scenario("Kafka Producer")
   .exec(kafka("Simple Message")
           .send("key","value", headers)
   );


Kafka is designed to work in an asynchronous way, meaning messages are sent and received independently. However, you can use the Kafka plugin to create more complex patterns, such as sending a request and waiting for a reply to ensure that system components have correctly received and processed the messages.
Moreover, you can create messages in various formats by using Avro libraries to serialize or deserialize objects.


Injection profile

You now need to define your load testing objective

Do you want to simulate production volumes? To understand your cluster’s limits? 

If your cluster is not yet in production and you are in an early stage of development, we recommend you do a capacity test. This type of test will allow you to check the overall behavior of your application.

{
    setUp(
           kafkaProducer.injectOpen(incrementUsersPerSec(1000)
                   .times(4).eachLevelLasting(60)
                   .separatedByRampsLasting(10)
                   .startingFrom(100.0))
   ).protocols(kafkaProtocol);
}


Complete Kafka Simulation class code example 

package kafka;

import io.gatling.javaapi.core.*;
import org.apache.kafka.common.header.*;
import org.apache.kafka.common.header.internals.*;
import org.galaxio.gatling.kafka.javaapi.protocol.*;
import org.apache.kafka.clients.producer.ProducerConfig;

import java.util.Map;

import static io.gatling.javaapi.core.CoreDsl.*;
import static org.galaxio.gatling.kafka.javaapi.KafkaDsl.*;
public class KafkaSimulation extends Simulation{
   public static final String IP_SERVER = System.getProperty("IP_SERVER", "");
   public static final String URL_REGISTRY = System.getProperty("URL_REGISTRY", "");
   public static final String USER_AUTH = System.getProperty("USER_AUTH", "");
   private final KafkaProtocolBuilder kafkaProtocol = kafka()
           .topic("test")
           .properties(
                   Map.of(
                           ProducerConfig.ACKS_CONFIG, "1",

ProducerConfig.BOOTSTRAP_SERVERS_CONFIG, "localhost:9092",

ProducerConfig.KEY_SERIALIZER_CLASS_CONFIG, "org.apache.kafka.common.serialization.StringSerializer",

ProducerConfig.VALUE_SERIALIZER_CLASS_CONFIG , "org.apache.kafka.common.serialization.StringSerializer")
           );

   private final Headers headers = new RecordHeaders(new Header[]{new RecordHeader("test-header", "value".getBytes())});

   private final ScenarioBuilder kafkaProducer = scenario("Kafka Producer")
       .exec(kafka("Simple Message")
               .send("key","value", headers)
       );

   {
        setUp(

kafkaProducer.injectOpen(incrementUsersPerSec(1000)
                       .times(4).eachLevelLasting(60)
                       .separatedByRampsLasting(10)
                       .startingFrom(100.0))
       ).protocols(kafkaProtocol);
   }
}


Execute the test

We recommend running your test locally to debug and ensure it works. 

To do so, run the Engine class or use Maven or Gradle.

You can find the details in the Maven and Gradle documentation, respectively. 

The next step is to use Gatling Enterprise Cloud to take advantage of key features such as: 

  • distributed load testing to inject heavy traffic,  
  • advanced reporting,
  • run history and comparison,
  • centralized reporting and access to a multi-tenant solution.


To do this, use your Gatling Enterprise account and follow the documentation for packaging and uploading your simulation. Then, follow either the Maven or Gradle plugin documentation to run your first simulation on Gatling Enterprise.

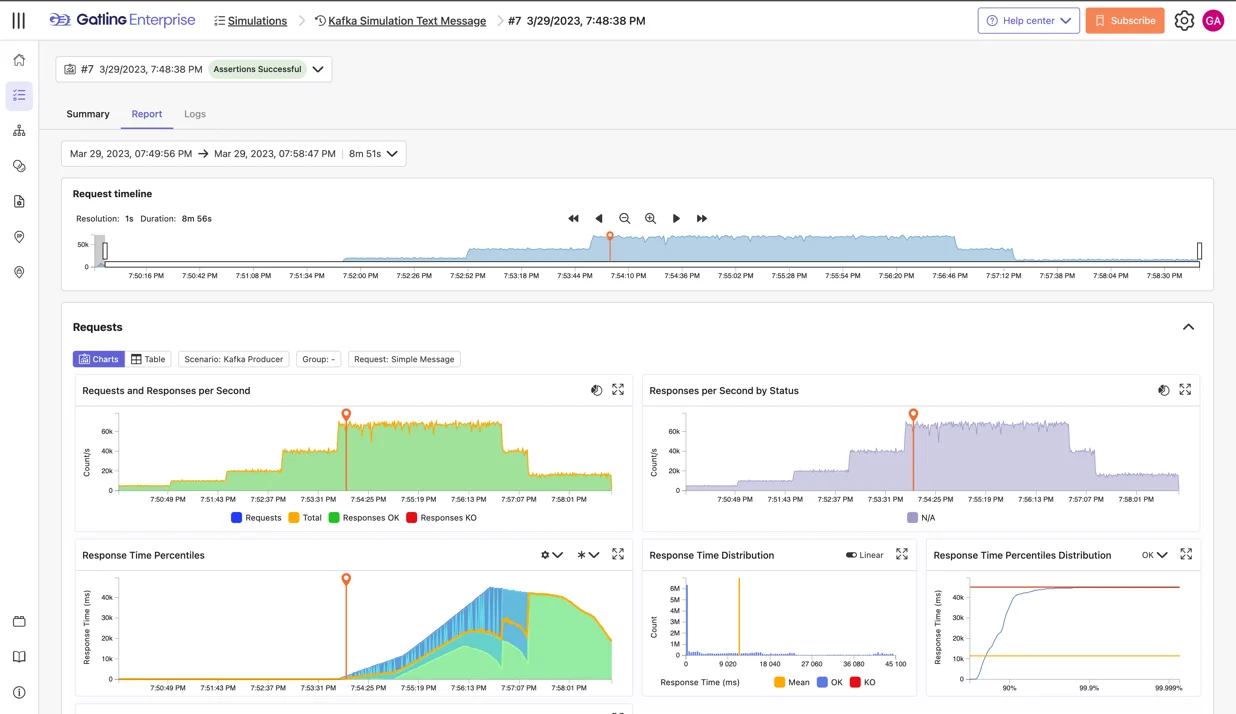
kafka-gatling-enterprise

Example report from Gatling Enterprise: Here we can see that performance deteriorates at around 60,000 requests per second.


Note: If your Kafka broker cannot be accessed from the Internet, you have two options:

  1. Private Locations – If your target environment is private (closed to the Internet).
  2. Dedicated IP Addresses – If your target environment is public (open to the Internet) but protected by a firewall.

Both of these features will allow you to run your tests in multiple environment configurations. Contact our team for more information.


How to install a Kafka cluster with Docker

If you can’t access a Kafka cluster, you can use Docker to start one on a server. You can use this Docker Compose configuration file to configure a Kafka cluster.

version: "3"
services:
  kafka:
    container_name: kafka
    image: 'bitnami/kafka:latest'
    ports:
      - 9092:9092     environment:
      - KAFKA_ENABLE_KRAFT=yes
  - KAFKA_CFG_NODE_ID=1
      - KAFKA_CFG_PROCESS_ROLES=broker,controller
      - KAFKA_CFG_CONTROLLER_LISTENER_NAMES=CONTROLLER
      - KAFKA_CFG_LISTENERS=PLAINTEXT://:9092,CONTROLLER://:9093
      -KAFKA_CFG_LISTENER_SECURITY_PROTOCOL_MAP=CONTROLLER:PLAINTEXT,PLAINTEXT:PLAINTEXT
      - KAFKA_CFG_ADVERTISED_LISTENERS=PLAINTEXT://127.0.0.1:9092
      - KAFKA_BROKER_ID=1
      - KAFKA_CFG_CONTROLLER_QUORUM_VOTERS=1@127.0.0.1:9093
      - ALLOW_PLAINTEXT_LISTENER=yes


To start this Kafka cluster, create a docker-compose.yml file, copy the contents above and paste it into the file, then run it with:

docker compose up -d


You can then create a test topic with this command:

docker exec -it kafka /opt/bitnami/kafka/bin/kafka-topics.sh --create --bootstrap-server localhost:9092 --replication-factor 1 --partitions 1 --topic test


To view the messages sent to the topic:

docker exec -it kafka /opt/bitnami/kafka/bin/kafka-console-consumer.sh --bootstrap-server localhost:9092 --from-beginning --topic test


To send messages to the topic:

docker exec -it kafka /opt/bitnami/kafka/bin/kafka-console-producer.sh --broker-list localhost:9092 --topic test


Conclusion

This guide demonstrates how to load test a Kafka cluster with Gatling. You can now develop a customized scenario that meets your testing needs. 

We recommend using one of our CI/CD plugins to quickly get feedback on your broker performance during development. 

Jump in and get started!