
Table of contents
Increase efficiency in your CI/CD pipeline with Gatling Enterprise Edition


Last updated on
Monday
September
2025
Increase efficiency in your CI/CD pipeline with Gatling Enterprise Edition
Load testing is essential for any application that you intend to scale. When should testing take place though? Doing all of your testing at the end of a project just before a deployment might mean you must reconsider critical pieces of your application that would require a huge effort to fix. Of course, you know it’s critical to test before any deployment. New deployments are one of the leading causes of downtime and according to a survey by Statista, the average cost of downtime in 2020 was at least 300,000 USD per hour for 88% of respondents. If you want to learn more about the cost of downtime we recently wrote about that as well. So, how can we be sure that a new deployment won’t cause crashes under extreme load? Or even worse, break a request or path that already exists? Using an automation-driven approach, you can implement load testing with Gatling Enterprise Cloud into your development process and reduce the number of bugs and errors that inevitably wind up in production.
What is CI/CD and how does it work with Gatling?
Modern agile development methodologies emphasize pushing out smaller and faster releases often during the software development lifecycle. CI/CD (Continuous Integration & Continuous Deployment or Delivery) is a central tool that can help companies achieve that goal.
One of the main principles of CI/CD is to involve automated testing prior to any deployment to ensure that nothing breaks when your changes go live. By using Gatling in your CI/CD process you can introduce load testing into your suite of automated tests to ensure that the changes you’re releasing do not cause any degradations in performance or crashes under various load conditions.
Getting started by building your test
The most important part about building a test is knowing your users and learning what behaviors and requests they’ll make when using your application. Once you know this you can craft a user scenario replicating this behavior. A simple example is this user journey on an e-commerce website:
User hits homepage > User searches a product > User views product > User adds to cart > User checks out > User hits thank you page
The above scenario covers the most critical pieces of the site's functionality that we’re testing. When creating your scenario try to think of it in the same way. What are the critical pieces of your application? Any API calls that are always happening? Any steps that get taken all the time? If you can capture all of these you’ve created a great test. You can learn how to use our recorder here.
You can run a smoke test with Gatling’s Open Source version to ensure your test is working and that all the requests you’re testing are OK.
Getting set up in Gatling Enterprise Cloud
Build your simulation and run your baseline test
Now that you’ve created your scenario it’s time to set up a simulation in Gatling Cloud. You can use our quick start guide here to get going but the basic steps are:
- Upload your scenario (in a package)
- Create your simulation (set your injection pools, any dedicated IPs, etc.)
- Run your simulation
You’ve now set your baseline. Your goal from here on out should be to improve your response times or at the very least make sure that they aren’t degrading over future tests.
Integrate Gatling with the CI/CD tool of your choice
Now that you’ve set up your test you can integrate with the CI/CD tool of your choice. Gatling Enterprise’s cloud version has native Bamboo, Jenkins, and TeamCity integrations. We also have a CI Script that you can use to create an integration with most other CI tools including Gitlab, Azure DevOps, or GitHub Actions.
In our documentation, you can find details on integrating the tool of your choice or using the CI script to make your own manual integration.
Choosing your CI/CD strategy
Within your tool, you can set up your tests to either run on a schedule (perform the same test nightly or whenever you please) or run your test on every deployment. Each individual plugin has its own documentation that will show you how to set up your chosen strategy. For example, you can find out how to trigger a run once you complete a build here. Your results will be exported into Jenkins and you will be able to see live reporting on your test.
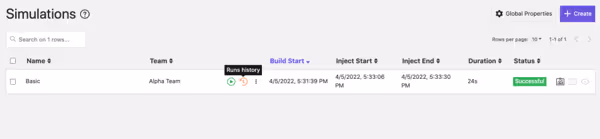
If you’d like to dig deeper into your build's performance, you can look at your simulation's Gatling Enterprise Cloud run history by going to the simulations dashboard and clicking on the run history button.
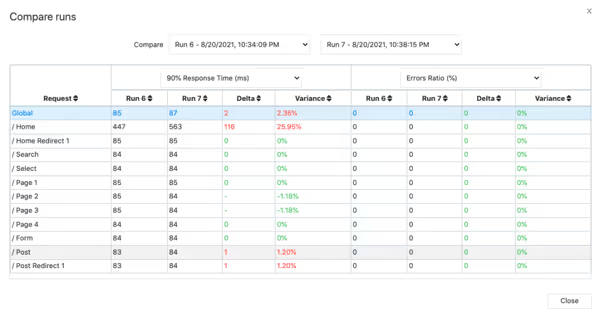
From there you can view trends and reports or compare the results of any two runs to view how your build has affected the response times and error ratios of the requests in your scenario; this will allow you to see any performance improvements or regressions caused by your latest build.
Get started today
The best time to implement load testing into your development pipeline is when you first start. The second best time is today. We’re here to help; click here to set up your Gatling Enterprise Cloud account and introduce load testing into your CI/CD process today. We’re happy to offer 60 free credits to start your testing process.
FAQ
FAQ
Related articles

Ready to move beyond local tests?
Start building a performance strategy that scales with your business.
Need technical references and tutorials?
Minimal features, for local use only
