Introduction to the Gatling Recorder
Learn Gatling concepts, and use the Recorder to create a runnable Gatling simulation.
Introduction
In this section we will use Gatling to load test a simple cloud hosted web server and will introduce you to the basic elements of the DSL (Domain Specific Language).
Picking the Right Language
Gatling provides:
- a Java DSL, introduced in Gatling 3.7, that can also be used in Kotlin
- the original Scala DSL
When picking a language for using Gatling, we recommend the following rule:
- if your target Gatling users are Scala developers, use Scala
- if they are Kotlin developers, use Kotlin
- otherwise, use Java
Java is widely taught in CS courses, requires less CPU for compiling and is easier to configure in maven or gradle.
Installing
Please check the installation section to pick a setup that matches your needs. Non developers are recommended to start with the bundle setup. In this tutorial, we will show the commands to use with the bundle setup.
Encoding
Gatling’s default encoding is UTF-8. If you want to use a different one, you have to:
- select the proper encoding while using the Recorder
- configure the proper encoding in the
gatling.conffile. It will be used for compiling your simulations, building your requests and your responses. - make sure your text editor encoding is properly configured to match.
Test Case
This page will guide you through most of Gatling HTTP features. You’ll learn about simulations, scenarios, feeders, recorder, loops, etc.
Sample Application
In this tutorial, we will use an application named Computer-Database deployed at the URL: http://computer-database.gatling.io.
Scenario
To test the performance of this application, we will create scenarios representative of what really happens when users navigate it.
Here is what we think a real user would do with the application:
- A user arrives at the application.
- The user searches for ‘macbook’.
- The user opens one of the related models.
- The user goes back to home page.
- The user iterates through pages.
- The user creates a new model.
Basics
Using the Recorder
To ease the creation of the scenario, we will use the Recorder, a tool provided with Gatling that allows you to record your actions on a web application and export them as a Gatling scenario.
This tool is launched with a script located in the bin directory:
- On Linux/Unix:
$GATLING_HOME/bin/recorder.sh
- On Windows:
%GATLING_HOME%\bin\recorder.bat
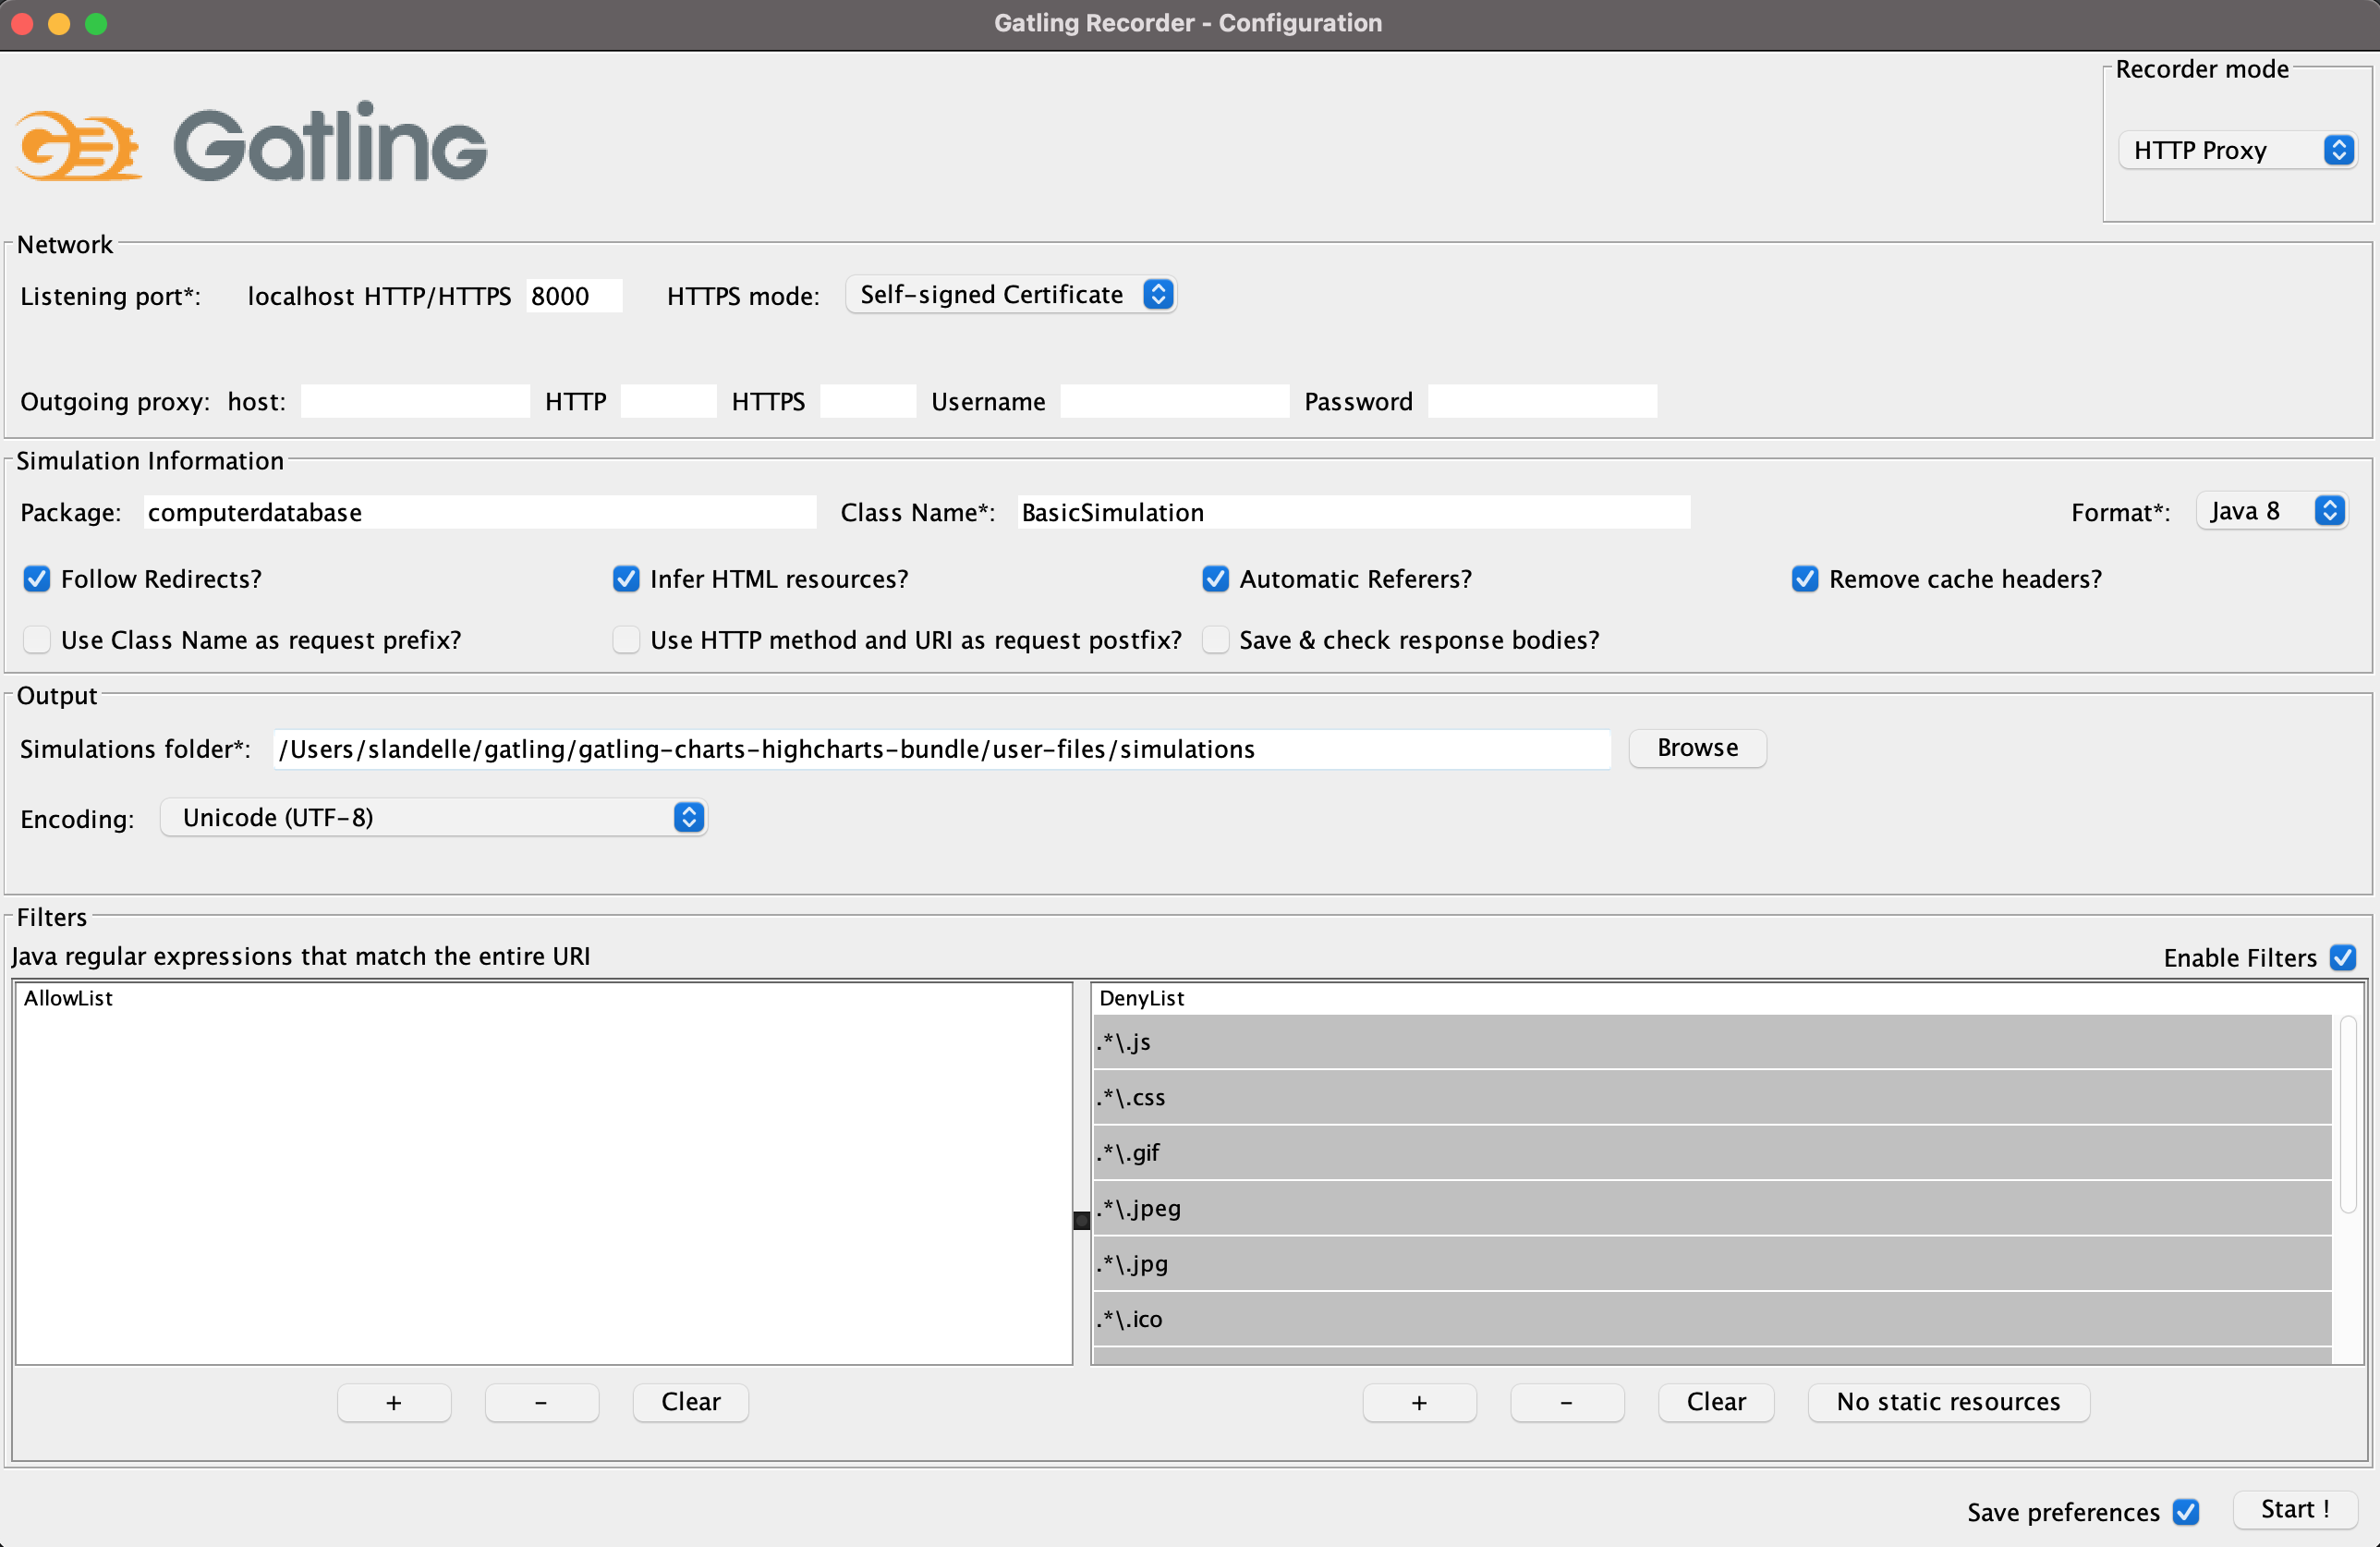
Once launched, the following GUI lets you configure how requests and responses will be recorded.
Set it up with the following options:
- Recorder Mode set to HTTP Proxy
- computerdatabase package
- BasicSimulation name
- Follow Redirects? checked
- Infer HTML resources? checked
- Automatic Referers? checked
- Remove cache headers? checked
- No static resources clicked
- Select the desired
format. The tutorials will assume “Java 8”
After configuring the recorder, all you have to do is to click on Start! and configure your browser to use Gatling Recorder’s proxy.
Recording the scenario
Now simply browse the application:
- Enter ‘Search’ tag.
- Go to the website: http://computer-database.gatling.io
- Search for models with ‘macbook’ in their name.
- Select ‘Macbook pro’.
- Enter ‘Browse’ tag.
- Go back to home page.
- Iterate several times through the model pages by clicking on the Next button.
- Enter ‘Edit’ tag.
- Click on Add new computer.
- Fill the form.
- Click on Create this computer.
Try to act as a real user would, don’t immediately jump from one page to another without taking the time to read. This will make your scenario closer to real users’ behavior.
When you have finished playing the scenario, click on Stop in the Recorder interface.
The Simulation will be generated in the folder user-files/simulations/computerdatabase of your Gatling installation under the name BasicSimulation.java.
Gatling scenario explained
Here is the produced output:
package computerdatabase; // 1

// 2
import io.gatling.javaapi.core.*;
import io.gatling.javaapi.http.*;

import static io.gatling.javaapi.core.CoreDsl.*;
import static io.gatling.javaapi.http.HttpDsl.*;

  public class BasicSimulation extends Simulation { // 3

    HttpProtocolBuilder httpProtocol = http // 4
      .baseUrl("http://computer-database.gatling.io") // 5
      .acceptHeader("text/html,application/xhtml+xml,application/xml;q=0.9,*/*;q=0.8") // 6
      .doNotTrackHeader("1")
      .acceptLanguageHeader("en-US,en;q=0.5")
      .acceptEncodingHeader("gzip, deflate")
      .userAgentHeader("Mozilla/5.0 (Windows NT 5.1; rv:31.0) Gecko/20100101 Firefox/31.0");

    ScenarioBuilder scn = scenario("BasicSimulation") // 7
      .exec(http("request_1") // 8
        .get("/")) // 9
      .pause(5); // 10

    {
      setUp( // 11
        scn.injectOpen(atOnceUsers(1)) // 12
      ).protocols(httpProtocol); // 13
    }
  }
package computerdatabase // 1

// 2
import io.gatling.javaapi.core.*
import io.gatling.javaapi.http.*
import io.gatling.javaapi.core.CoreDsl.*
import io.gatling.javaapi.http.HttpDsl.*

  class BasicSimulation: Simulation() { // 3

    val httpProtocol = http // 4
      .baseUrl("http://computer-database.gatling.io") // 5
      .acceptHeader("text/html,application/xhtml+xml,application/xml;q=0.9,*/*;q=0.8") // 6
      .doNotTrackHeader("1")
      .acceptLanguageHeader("en-US,en;q=0.5")
      .acceptEncodingHeader("gzip, deflate")
      .userAgentHeader("Mozilla/5.0 (Windows NT 5.1; rv:31.0) Gecko/20100101 Firefox/31.0")

    val scn = scenario("BasicSimulation") // 7
      .exec(http("request_1") // 8
        .get("/")) // 9
      .pause(5) // 10

    init {
      setUp( // 11
        scn.injectOpen(atOnceUsers(1)) // 12
      ).protocols(httpProtocol) // 13
    }
  }
package computerdatabase // 1

import scala.concurrent.duration._

// 2
import io.gatling.core.Predef._
import io.gatling.http.Predef._

  class BasicSimulation extends Simulation { // 3

    val httpProtocol = http // 4
      .baseUrl("http://computer-database.gatling.io") // 5
      .acceptHeader("text/html,application/xhtml+xml,application/xml;q=0.9,*/*;q=0.8") // 6
      .doNotTrackHeader("1")
      .acceptLanguageHeader("en-US,en;q=0.5")
      .acceptEncodingHeader("gzip, deflate")
      .userAgentHeader("Mozilla/5.0 (Windows NT 5.1; rv:31.0) Gecko/20100101 Firefox/31.0")

    val scn = scenario("BasicSimulation") // 7
      .exec(http("request_1") // 8
        .get("/")) // 9
      .pause(5) // 10

    setUp( // 11
      scn.inject(atOnceUsers(1)) // 12
    ).protocols(httpProtocol) // 13
  }
What does it mean?
- The optional package.
- The required imports.
- The class declaration. Note that it extends
Simulation. - The common configuration to all HTTP requests.
- The baseUrl that will be prepended to all relative urls.
- Common HTTP headers that will be sent with all the requests.
- The scenario definition.
- An HTTP request, named request_1. This name will be displayed in the final reports.
- The url this request targets with the GET method.
- Some pause/think time.
seconds, e.g. pause(5) is equivalent to java.time.Duration.ofSeconds(5) in Java or pause(5.seconds) in Scala.- Where one sets up the scenarios that will be launched in this Simulation.
- Declaring that we will inject one single user into the scenario named scn.
- Attaching the HTTP configuration declared above.
Running Gatling
Launch the second script located in the bin directory:
- On Linux/Unix:
$GATLING_HOME/bin/gatling.sh
- On Windows:
%GATLING_HOME%\bin\gatling.bat
You should see a menu with the following choice:
Do you want to run the simulation locally, on Gatling Enterprise, or just package it?
Type the number corresponding to your choice and press enter
[0] <Quit>
[1] Run the Simulation locally
[2] Run the Simulation on Gatling Enterprise Cloud
[3] Package the Simulation for Gatling Enterprise
Press 1 then enter.
You should then see a menu with the simulation examples:
Choose a simulation number:
[0] computerdatabase.BasicSimulation
[1] computerdatabase.advanced.AdvancedSimulationStep01
[2] computerdatabase.advanced.AdvancedSimulationStep02
[3] computerdatabase.advanced.AdvancedSimulationStep03
[4] computerdatabase.advanced.AdvancedSimulationStep04
[5] computerdatabase.advanced.AdvancedSimulationStep05
Press 0 then enter. Press enter next when gatling asks for a run description.
When the simulation is done, the console will display a link to the HTML reports.
Going Further
When you’re ready to go further, please check out the Advanced Tutorial.